
Hey guys and welcome to part 4 of this series. In the last part we started setting things up so when we click on the stars in the galaxy we can see a solar system.
In this part we will continue towards this goal by:
- Adding a Seed Number for our Random Numbers
- Setting up Input Controls so we can Click on the Stars
1. Adding a Seed Number
So far we have used a lot of random numbers in our code. Random numbers in C# are not completely random but based on calculations the computer makes. This means we can predict what numbers will appear if we know where the computer is. Unity has a handy method for setting this start point, Random.InitState().
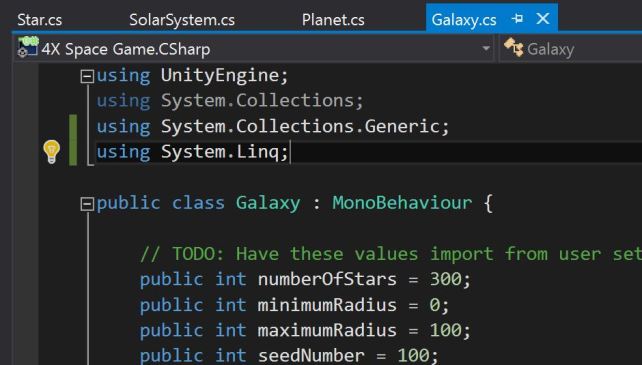
Open up the Galaxy script and add a new public int called seedNumber. You can set it equal to whatever you like but in this example I have used 100. Making it public will mean it will be easy for us to play around with the number in the inspector.


Now we need to add a Random.InitState to the Start method using seedNumber. Put this after the call to the SanityChecks method.

If we press play in Unity now you should notice the galaxy always looks the same. Not only that but all the planet data appearing in the console will always be the same!
That is until we change the seed number. Try playing around and find a number you like the look of.
2. Setting up Input Controls
Open up the SolarSystem script, its time to add some code to it.
We will be using a Ray and RayCastHit to determine if the mouse is over a star GameObject on every frame of the game. This means we need to declare a Ray and a RaycastHit in the Update method. Call them mouseRay and hit respectively. But how do we know where the mouse is in the game?
Luckily Unity has a handy method we can use to get this without much hassle, Camera.ScreenPointToRay. We pass this the Input.mousePosition method to get our mouseRay. As for hit we simply make it equal to a new RaycastHit.

Add an if statement to the method. For our conditions we use the Physics.Raycast and Input.GetMouseButtonDown methods built into Unity.
The solar system should appear when the mouse pointer is above a star AND the left mouse button is pressed down, so add an && between the Raycast and GetMouseButtonDown methods. Pass the Raycast method mouseRay and hit.
Note: hit requires out put before it because reasons.
Finally, pass the GetMouseButtonDown method 0 (zero) as that is the index Unity assigns the left mouse button.

Whats next? Well at the moment we have no way of relating the GameObjects to the Stars they are meant to represent. We will need to add some stuff to our Galaxy script before we continue with this if statement.
To associate the object with the data we will be using a Dictionary. In the Galaxy script below our availablePlanetTypes array declare a Dictionary with Keys Star and Values GameObject. Call this Dictionary starsToObjectMap and make it public with a get and protected set function.

After we have carried out the sanity checks we need to initialise starToObjectMap.

After we create starGO we need to add starData and starGO to starToObjectMap.

This Dictionary now allows us to associate both the Star and the GameObject which is exactly what we want. Now we just need to be able to find the Star data from the GameObject. To do this we require a new method (in the Galaxy script).
Call the new method ReturnStarFromGameObject, make it public and have it return a star. It will also need to be passed a GameObject.

If our Dictionary includes the GameObject passed to the method, it should find its index and return the Star associated with it. Unfortunately Dictionaries don’t use indexes directly so we have to convert the Values part (GameObjects) into a list and find the index from that list. We then need to convert the Keys part (Stars) into a list and find the Star at the same index as the GameObject. To do this we need to add “using System.Linq” to the top of the script.
This sounds very complicated but it isn’t really. Just copy the code in the pictures. If you are having problems understanding what is going on leave me a comment and I will try to help :).

There’s just one more thing we need to do before we can get some feedback from the mouse click. The SolarSystem script needs to be able to get data from the Galaxy script. There are several ways we could do this. We could add a public Galaxy to the SolarSystem script and add it in the inspector. I don’t like this method however because we could easily forget to do this or something else could go wrong. Instead what we will do is in our Galaxy script we will declare a public static Galaxy called GalaxyInstance. Then we use the Unity built in method OnEnable to make GalaxyInstance equal this script.

We can do this because there will always only be one Galaxy script in our game. We can also say the same about the SolarSystem script so we may as well do the same thing with that now.

There are some fail safes we could add to this to make sure we don’t accidentally have two instances but I think for now it will be fine.
We can finally start clicking on stars and getting feedback!
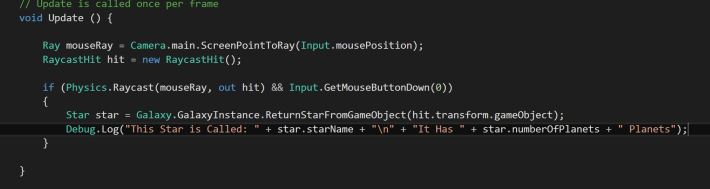
In the Update method in SolarSystem, we need to look up the Star we have clicked on and we can now do that using our GalaxyInstance and ReturnStarFromObject method. Declare a Star called star and make it equal to “Galaxy.GalaxyInstance.ReturnStarFromObject” and pass it “hit.transform.gameObject”.

Add a Debug.Log to show this stars name and the number of planets it has.
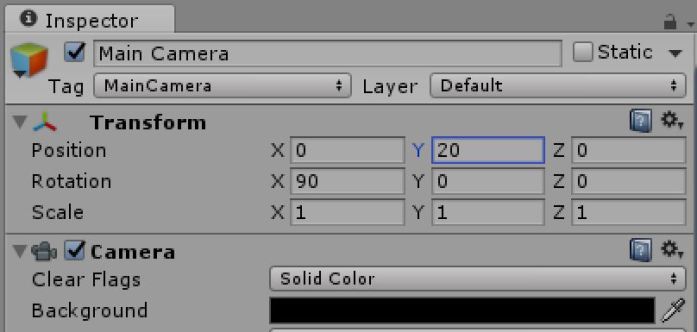
Before pressing play go to the Galaxy script and comment out all the other Debug.Logs (using Ctrl/Command F is useful here) and change the camera Y position to about 20 (this makes it easier to click on the stars).
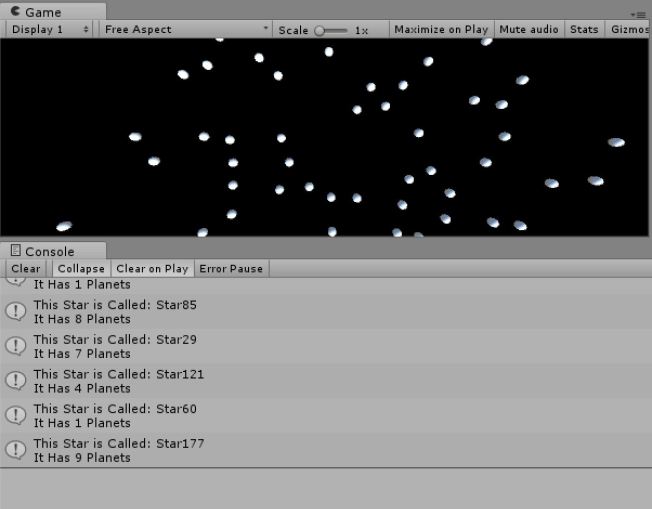
Press play click to your hearts content as the Star name and how many planets it has appear in the console!
And that concludes this part! In the next part we will finish this off so we can finally see some solar systems appear!
scripts_for_part_4 (zip file)

Hi again, i just have a little question… on the galaxy view when i zoom in my stars are not spheres at all but some pixelated squares unlike the first image of this fourth part. I don’t use your scripts, i type them myself while following the tutorial so it could be an error in my code or could it be a setting in unity ? if you have any idea i would be glad to hear it.
And again, great tutorial, i have a lot of fun following it and i already learnt a lot.
LikeLike
Hi Aymeric. How are you zooming in? Are you changing the location of the camera or are you using the scale bar on the game port view? If you use the scale bar it scales the camera as an image and so will make the spheres look pixelated. If you change the cameras Y location it should work. If you are still having issues send me an email (shadowplaycoding@gmail.com) with some screenshots and I can try to assist you further 🙂
LikeLike
Thank you very much for your quick answer. I was about to change my first comment cause as you said i was zooming in by changing scale. In fact i just finished the fourth part and everything was exactly as the first picture with spheres and no pixelated squares.
PS: sorry if i’m not clear sometimes, english is not my first language and that says a lot about how clear your tutorial is cause i have no problem following you.
LikeLike
Hello! Loving this series so far and have been able to follow along fine until now. In the Galaxy script, vs detects Random.InitState(seedNumber) as an error and says that ” ‘Random’ does not contain a definition for ‘InitState’ “. I searched a bit online but I can’t figure out what I did wrong…
LikeLike
Hi Aeder if you send me your code to shadowplaycoding@gmail.com I will have a look at it for you 🙂
LikeLike
Thanks for the answer! My code is basically the same as yours.. On top of that I have the same problem when downloading your version
LikeLike
Okay I searched a little and ended up using Random.seed instead of Random.InitState(). Will this work?
LikeLike
Update: Instead of asking I should have just tried it out. It seems to work as the stars are always placed in the same position! Sorry for spamming this comment thread.
LikeLike
I am also having the same issue. “UnityEngine.Random does not contain a definition for InitState”
LikeLike
What version of Unity are you both using? The documents on InitState is here: https://docs.unity3d.com/ScriptReference/Random.InitState.html
It should work in the latest Unity Version
Try random.seed and let me know if that works for you too
LikeLike
One thing I did not immediately get is that we need the Dictionary not only for establishing pairings between the sphere game object and the star data, but most importantly – for actually _storing_ the star data somewhere. Because in previous lesson when we did not have a Dictionary all that data was effetively lost after the Start() function of the Galaxy script ended its execution. Am I right?
Also, I tired to revert the key – value placement for the Dictionary and declared it as
Dicionary instead of Dictionary
and in this case it seems there is no need to do the keys and values indexing, and instead I was able to access the star data simply like this and it worked:
public Star ReturnStarFromGameObject(GameObject go)
{
return StarToObjectMap[go];
}
LikeLike
Hi xamyak, you are right we need the dictionary to store the data as well as compare it. Without it all the data is garbage collected 🙂
LikeLike
Hi, I keep getting NullreferenceException errors, one every frame, and I dont seem to be able to click any stars
LikeLike
i Tobijon, which object is the null reference exception referring too? Can you send me a screenshot either to my email (shadowplaycoding@gmail.com) or on twitter (@SP_Coding) and I will do my best to help 🙂
LikeLike
the null came from the return null, when not clicking a star, but i managed to solve the problem (somehow, not sure what i did)
LikeLike
When you do
Random.InitState((Int32)(DateTime.UtcNow.Subtract(new DateTime(1970, 1, 1))).TotalSeconds)
you dont need predefined seeds and its diffrent anytime you press play. This sets an int for seed based on unixtime (seconds since 01.01.1970).
Just if anybody wants to have this option 😉
LikeLike