
Hi guys and welcome to part 25. In the last part we worked on our UI so that when we click on a planet with a star base, we get a star base panel with a build ship button. In this part we will set up a build cue.
Create a new child on the starbase panel; a scrollbar object (under the UI option). Rename this Build Cue List.

Align the object something like the picture below and disable the horizontal option in the Scroll Rect component in the inspector.


Find the Content object (Build Cue List > ViewPort > Content) and add a vertical layout group to it. Select both Control Size and Child Force Expand width options but make sure both height options are deselected. Give a padding of 3 all the way around and leave spacing at 0.


Create a button and make it the child of the Content object. Rename the button in the hierarchy to Ship Blueprint Button.

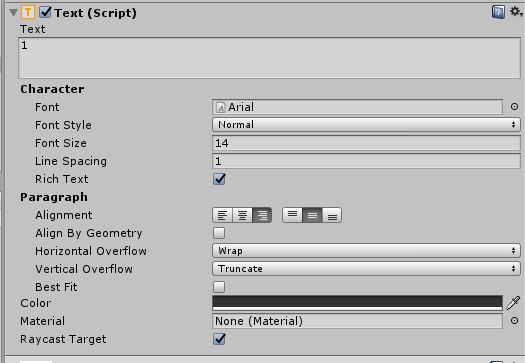
Align the text left and then move the object right slightly so it isn’t touching the edge of the button. Change the default text to “Ship”.


Add another text object to the button and align this one right. Change the default text to 1. Change the name of the two text objects; this new one to Turns Text and the other to Ship Title Text.


Drag the Ship Blueprint Button into the prefab folder to make it a prefab. Then delete the one in the hierarchy.

We need a way of adding a button to the list when we hit the build ship button.
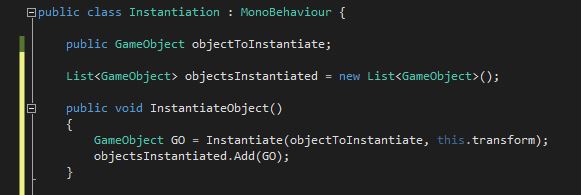
To do this lets create a new script and add it to our Content object. Call this script Instantiation. In the code add a public GameObject called objectToInstantiate and delete the Start and Update methods.

Next add a list of GameObjects called objectsInstantiated and set it equal to a new list of type GameObject.

Add a public void method called InstantiateObject, do not pass it anything.

In InstantiateObject simply add code to instantiate objectToInstantiate and set the parent to this. Also add the object to objectsInstantiated.
We need a way to remove the button from the list so add another public void method called RemoveObject. Pass this one a GameObject and add an if statement which checks the passed GameObject is in the list we created. If it is we need to remove it.

Now we have a simple script we can apply to other objects later on if we need to (planet building que UI, job list UI etc…). To complete our ship building UI however we need to link our build ship button with this new script.
First add our Ship Blueprint Button to the GameObject slot in the Instantiation script on Content.

On the Build Ship Button add a new OnClick. Set the Object as Content and then the function as InstantiateObject.

Hit play and check the Ship Blueprint Button appears when you press the Build Ship Button.
Next we need to destroy the buttons when they are clicked. Add a Ship Blueprint Button into the Hierarchy so we can edit it. To destroy the buttons it is a little bit more complex, we first need to add a script to the button called ClearBlueprintButton.
Delete the Update method and add a Instantiation called ins (just to keep it simple). In the start method set ins equal to the Instantiation in this objects parent.

Lastly add a method called DestroyObject. In this object call the RemoveObject method in ins passing it this GameObject. Then Destroy this GameObject.

Now all we need to do is add the DestroyObject method to the Ship Blueprint Button OnClick. Don’t forget to apply the changes to the prefab and then remove it from the hierarchy.

Hit play and check that you can add buttons to the list and delete them by clicking on them.
That concludes this part.
Before I end the blog I just want to address whether going forward this game will be turn based or real time. I would love to show you guys how to make both, however I do not have enough time to do that. From what I have read online and some conversations I have had with people following this tutorial I have decided that this will be a turn based game.
Therefore in the next part we will start to make a turn based system so it takes a number of turns for our ships to build.

Well it’s been over 2 months. Are you going to post anything new here soon?
LikeLike
Hi Kohi, sorry its been a while life as been very busy the last couple of months. I am aiming to have the next part up by Feb 14th.
LikeLike
Hello there,
Do you plan to continue this tutorial?
There is no update since some time now.
LikeLike
Hey, I am working on a version 2 of the tutorial but I am unable to give a release date at the moment.
LikeLike
Any idea on version 2 of the tutorial ? Your site is amazing.
LikeLike
Hi Mike, unfortunately I have no idea as to a release date yet. I have been working on version 2 when I have had some time but its slow going. Thanks for the feedback
LikeLiked by 1 person
Great stuff, I am looking forward to the new version of the tutorial! I would love to see some of the more complex stuff like AI and combat.
LikeLike