
Hi guys! Welcome to a tutorial on how to make a 4X space game using unity. This tutorial will have multiple parts and I am hoping to publish a new part at least once a week. I will assume you have some basic Unity and C# knowledge. The code may not be the most efficient way to make things work, however, I find it is better to make things work first and then go back and optimise it later. All the code in each part will be available to download at the bottom of the post.
In this first part, we will create a galaxy of stars using the Unity sphere GameObject. Making the stars a 3D object might not be the best way to do things but this will demonstrate the concept (and they could be substituted for 2D sprites later on).
First things first create a new project in Unity and call it whatever you want.

Now that the new scene is open create a new Empty GameObject, call it something like Galaxy Manager and set the position to (0,0,0). This will be the object which holds all the scripts and objects related to our galaxy. Also save the scene and name it whatever you’d like.

Let’s keep things organised. In the project tab create two new folders. Call one Scenes and one Scripts. Drag the newly saved scene into the Scenes folder. In the scripts folder create a new C# script and call it Galaxy.

Open up the script. I am using Visual Studio to write the code but if you are using MonoDevelop it will work the same; so don’t be put off if the program in the picture looks different to yours.
At this stage we need to ask ourselves ‘what does a galaxy require?’
- A galaxy is made up of stars so it would be a good idea to add an int of number of stars.
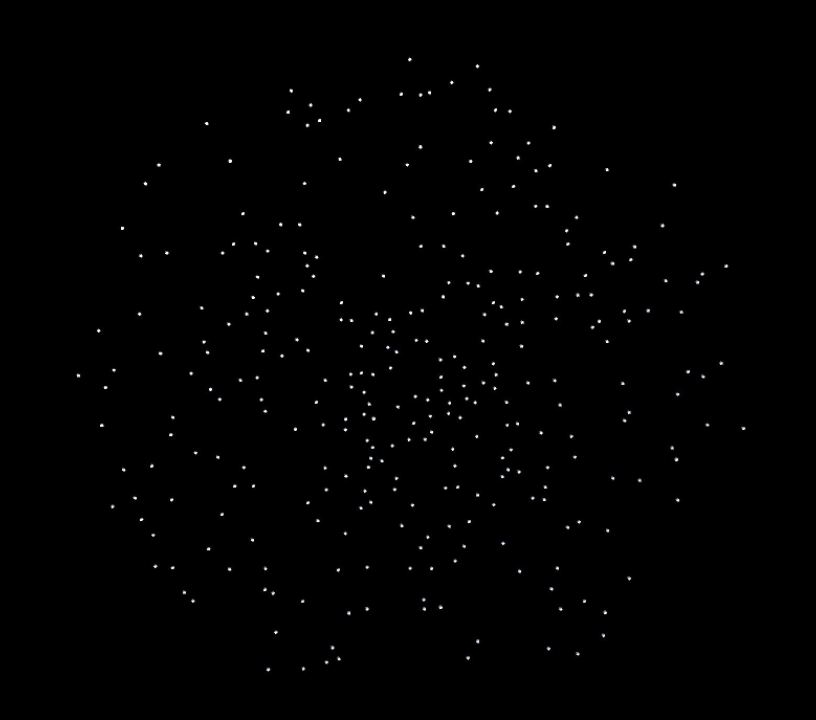
- The initial galaxy we will be creating is a simple disc. Disc galaxies are circle shape, usually with a higher density of stars in the centre. Circles have a radius so we should include a maximum radius the stars can be away from the centre of the galaxy.
We will make these values public for now to make it easy to change the number. However, in the future we will probably want to be able to import these values from the settings the player chooses on a main menu screen. Let’s give the number of stars a default value of 300 and the maximum radius 100.

So how do we make a sphere? In unity there is an easy way to make the built in primitive shapes like spheres – GameObject.CreatePrimitive . We will add this to the Start method.

Let’s add this script to the Galaxy Manager object we made earlier. Don’t forget to save the script.

Now if we press play, a sphere should appear in the centre of the scene. Notice it also appears in the hierarchy.


While this is a good first step, a galaxy with only one star isn’t a very good galaxy! So how do we add more stars?
A simple for loop will do the job. We simply nest the line that generates the sphere in a for loop which starts at 0 and ends when we reach the correct number of stars.

But before we press play, we need to solve a problem. All the spheres will appear in the same place! So how do we position all the stars in a circle? The answer is we create some polar coordinates and then convert them to Cartesian coordinates which we insert into the spheres transform. If that sounds complicated, don’t worry its not as hard as it sounds.
To get a polar coordinate we need a distance (the radius) and an angle. So in our for loop we need to create two private floats to represent these two things.

Now we need to assign these floats some values. In most 4X games the galaxy is randomly generated at the start of the game so that no two games are the same. This is the approach we will take. To do this we use Random.Range for both distance and angle. That way the stars will be in a different position every time we load a new galaxy. But what will our ranges be? For the angle, it is easy; it is simply between 0 and 2π (we will use radians instead of degrees as this will make things much easier). For the distance we will use a range of 0 and the maximum radius we declared at the very start of our class.

Now we have some polar coordinates we need to convert them to Cartesian coordinates. To do this we need to create a Vector3 where the X coordinate is distance * Cos(angle) and the Z coordinate is distance * Sin(angle). The Y coordinate will be 0 for now as we will be creating our galaxy in the XZ plane. Call this Vector3 something like cartPosition.

Now we can change the spheres transform to these coordinates. To do this we will first need to edit the line where we create the sphere. We will need to store this in a GameObject variable. Let’s call this starGO to make it easy to identify as the star GameObject. Next we need to change the transform of starGO using transform.position.

Save the script. Back in Unity change the camera transform to (0, 200, 0) and it’s rotation to (90, 0, 0). Still in the camera inspector change “Clear Flags” from “SkyBox” to “Solid Color”. Change “Background” to a black colour so the stars standout more. Save the Scene and finally hit play. You should see a disk galaxy appear! Not only that but every time you stop the game and press play again the galaxy should be different!

Congratulations, you have made it through the first part of the Tutorial! In the next part we will stop the stars from overlapping with each other, discuss ring shaped galaxies and create data for each star so it is unique. In the meantime experiment with different numbers of stars and size of galaxies by changing the values on the Galaxy Manger object.
Download the Galaxy script here:
scripts_for_part1 (zip file)
Galaxy (paste bin)
Part 2 Making the Stars Unique

That’s a really great tutorial. I’ve been searching for something like that for quite a long time. Thanks a lot, it’s really clear and easy to understand.
LikeLiked by 1 person
Thank you for your feedback Aymeric :).
LikeLike