
Hi guys, happy new year and welcome to part 3 of this tutorial. In the last tutorial we stopped the stars in our galaxy colliding, made some data for each star and made it so we can easily change our galaxy from a disk to a ring.
In this tutorial we will:
- Tidy up our code so it is easier to read.
- Star setting up solar systems.
1. Tidying Up Our Code
Even though the code we have written so far works, it could be made much neater by splitting stuff up into different methods. This will make the code easier to read and help us keep track of what is going on.
Open up the Galaxy script. In our start method the first thing that happens is we check to see if the minimumRadius is smaller than the maximumRadius. This can go in its own method, so add a new method at the bottom of the class called SanityChecks. This method doesn’t return anything, so make it void and doesn’t need to be passed any values. Cut and paste the if statement checking the radii into the method.

Now where we just cut and pasted the if statement from, call SanityChecks.

Add a comment above the SanityChecks method to explain what it does (like the Start and Update have). We will probably add more checks to this method so write something like:
“This method checks game logic to make sure things are correct before the galaxy is created”
I won’t show you a picture of this as I will assume you know how to add a comment. We can also delete the update method as it won’t be used in this script.
If we look at our for loop the next thing that happens is we create the star data. There is only one line which does this so we will leave it as is for now.
Next, we get a random distance and angle to calculate the star objects position. This could be moved to a method of its own. This time the method will return a Vector3 but does not need to be passed anything. Call it RandomPosition and cut/paste the distance, angle and cartPosition calculations into the new method. Remember to return cartPosition.
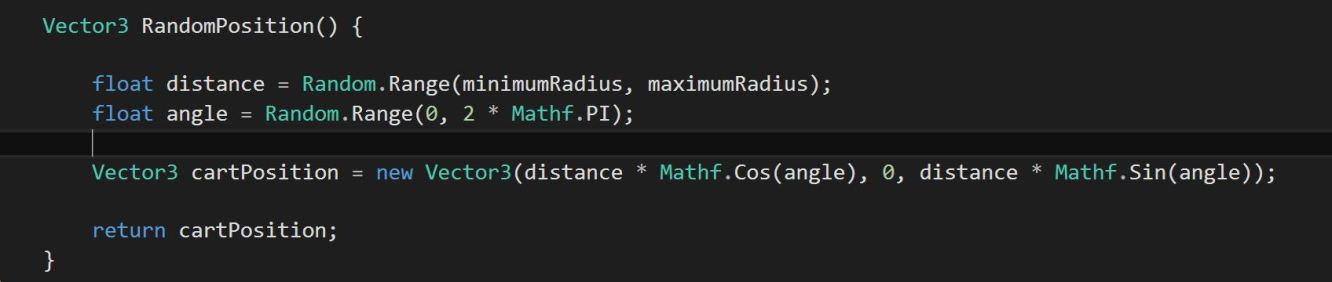
Where the calculations were cut from add a new line declaring a Vector3 equal to RandomPosition().

Again, add a comment above the new method saying something like:
“This method creates a random polar coordinate then converts and returns it as a Cartesian coordinate”
Going back to our for loop the next line creates the collider array to check there is no overlaps. Again, as this is only one line to execute this command, we will leave it as is for now.
Next, the game creates a GameObject if there are no collisions. Creating the GameObject could be its own method. Let’s call this one CreateSphereGameObject. It will need to return a GameObject and will need to be passed a Star and a Vector3 (call these starData and cartPosition so we don’t need to worry about editing the code we already have). Cut/paste all of the code contained in the if statement apart from setting failCount to 0 and return starGO. Returning to the if statement, add a line where the old code used to be declaring a GameObject equal to CreateSphereGameobject(starData, cartPosition).


We will leave the rest of the code as is for now. In the future if I decide to change the code to tidy it up, like we just did, I will provide it at the top of the tutorial. I just wanted to go through these basic changes now to show better ways of structuring code.
2. Setting up Solar Systems
So, at the moment we have a galaxy of spheres but they don’t really do anything. The aim is to be able to click on them and load up a solar system. We won’t finish this in this tutorial but we will start to set it up.
Start off by creating a new empty GameObject and call it Solar System Manager. Then, create a new script in the scripts folder, call it SolarSystem and add it to the Solar System Manager Object.

Create a second script in the script folder and call it Planet. This will be a pure class like our Star script so delete the “: Monobehaviour” and the Start and Update methods.

Now, like our stars our planets will need a name. We could also have a planet type (for example barren, Terran or gas giant). So lets declare a string for the name and a string for the planet type.

Now make a constructor called Planet and have it be passed two strings (one for the name and one for type). Like in our Star constructor in our Star script equate the passed values with the declared ones above.

Now we have our planet data set up we need to create this data somewhere. We will create our planet data in our Galaxy script so lets add a new method called CreatePlanetData. This will need to be passed a Star so we can associate the two.

Now before we declare a new planet in our new method we need to make a slight tweak to our Star script. Open the Star script and at the very top add “using System.Collections.Generic”; this will allow us to use Lists. Now declare a public List of type Planet and call it something like planetList.

In our Star constructor make planetList equal to a new list of type Planet.

Back in our Galaxy script add “using System.Colections.Generic” to the top like we did in our Star script and then go back to the CreatePlanetData method.
So how are we going to make data for each of the star’s planets? We use a for loop of course with a limit of the stars numberOfPlanets. In the loop, we will create a new planet and add it to the stars planetList. But what do we use for the strings we have to pass the Planet constructor?
In the future we will import a list of names for the star name, however for now we will write a solution in code. In the newly created for loop declare a string called name.
In most 4X games the planets are named “Star Name X” where X is the number of the planet (with 1 being the closest planet to the star). Therefore to make the planet name we take the star name and concatenate it with the stars current planetList count, plus one. We need the plus one because the first item in a list is number 0 not 1. Don’t forget to use the ToString() method to convert this int to a string.

Now we need to create a string for the planet type. In a later tutorial we will import a list of available planet types and the probability of them occurring however for now we will add a public array of strings called availablePlanetTypes to our Galaxy script. Add Barren, Terran and Gas Giant to the array.

In the CreatePlanetData method we can now create a string that is equal to one in the array. We could use a random number between 0 and 2 to select which planet type however statistically that will mean equal number of each planet in our galaxy. A more interesting approach would be to create a random number between 1 and 100 then create if statements (for example: if the number is below 40 the type is barren, between 40 and 50 its a terran planet else it is a gas giant) that way we can control the frequency of the different planets. Create an int, call it random and make it equal to a random number between 1 and 100. Also create a string and call it type making it equal to “”, then create the if statements.

Note: This is by no means the most efficient way to do this as it involves changing the code every time a new planet type is added to our availablePlanetTypes array but it will work for now and we can change the way it works later on.
Ok so we have two strings but have not yet created a planet. Let’s call the Planet constructor and pass it name and type. Add a Debug.Log underneath to show the planetName and planetType so we can see that it is working. Finally add the planet to the planetList of the star using List.Add.

Go back to unity and press play to check everything is working. You should see all the planet names and types appear in the console.

That concludes this tutorial. We now have a good foundation to create our solar systems in the game view. In the next tutorial we will introduce a seed number to our galaxy and set up the input controls to click on the stars.
scripts_for_part_3 (zip file)

The code shown in the tutorial itself doesn’t actually call CreatePlanetData(), it just defines the method.
LikeLike