Hi guys and welcome to part 15. In the last part we finished creating spiral galaxies and fixed a couple of issues with the camera. In this part we will import a name list for our stars and display the names in the game. I have created a list of 300 names for stars based on mythological figures, locations and important items from ancient religions (Greek, Egyptian, Norse etc…). You can get it here:
Star Names (zip file)
Star Names (paste bin – call the txt file starNames1)
1. Displaying the Star Names
We will begin with how to display the names. After all our stars already have names, they are just very boring.
We will be using something called a TextMesh to display the names and we will offset this below our GameObjects.
Open up the SpaceObjects script. Add a new public static void method called CreateNamePlate. Pass it a GameObject called go.

Now we need to create a new TextMesh. We do that by declaring a TextMesh (call it nameText) and setting it equal to a new GameObject with a TextMesh component added to it. We use the GameObject.AddComponent function for this. Name the new GameObject go.name + ” Name Plate” so we can easily identify it in the hierarchy.

Make nameText a child of go and set its text to be the same as go’s name.

We want to display the text underneath the object. After a bit of experimenting I found 1.2 units below the object looked quite good. Set the local position to (0, 1.2f, 0).
We also want to anchor the text to the middle centre and align it to the centre. For these we use TextAnchor and TextAlignment.

Finally we need to set the colour (color) to white and the font size. Font size 10 looks good for now.

All that’s left is to call CreateNamePlate. But where do we call it? Let’s call it in CreateSphereObject after we set the sphere’s parent. That way it will work on our planets too. Don’t forget to pass it sphere.

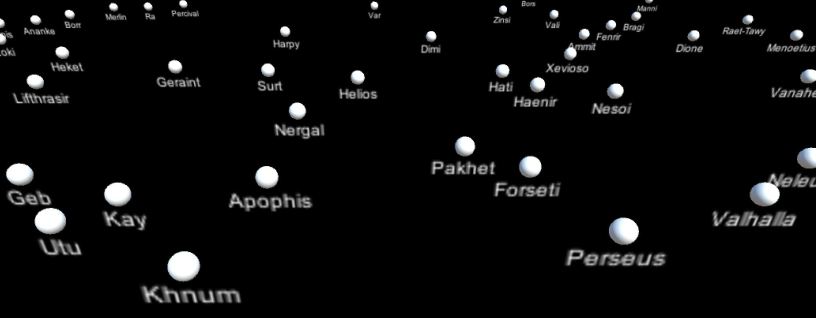
Hit play and you should see something like the picture below:


Great we can now see the names of the stars and planets! I know its not perfect because the text doesn’t change with camera angle and we cant see it once we zoom out. However, we will tackle that in a future tutorial. For now it will let us know our imported names are working.
2. Star Names from a TextAsset
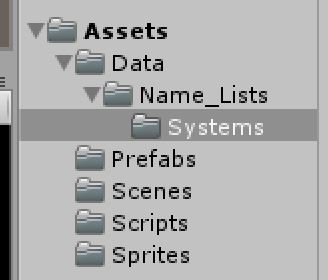
Right let’s start importing names shall we. In assets add a new folder called Data. In that folder create a new folder called Name_Lists. Finally in this folder add a new folder called Systems and drag in the starNames1.txt file.

So how do we add this file to our game? Well for now what we will do is add a public TextAsset to our Galaxy script and add it in the inspector.
Note: In the future we will probably want to give the player the option to select which name list they would like to use when they set up their game. We will cover this in a future tutorial when we actually have a main menu and perhaps more name lists. For now this basic set up will do.


This would also be a good time to set the number of stars in the Galaxy to 300 or less. We have 300 names in the name list and the solution I am about to show you will not work if there are more stars than names. We will fix this issue in the next tutorial, but for now just make sure there are 300 or less stars in the galaxy.
We are going to be using name lists for a lot of things in our game. Stars, planets, ships etc… For this reason it might be a good idea to create a new class to handle any code involving these TextAssets.
Create a new script called TextAssetManager and make it a pure class (delete monobehavior and the start and update methods.

Add “using System.Linq” to the top of the script as this will give us access to the ToList<> function. Next add a new public static method called TextToList. Have it return a List of type string and pass it a text asset.

Declare a new list of type string called textList and return it.

So how do we turn our text asset into a list? Well what we can do is turn the asset into an array and then turn that array into a list. We will be using a function called split to split the text at every new line. The syntax for this is TextAsset.text.Split(“\n” [0]).
Note: “\n” is the code for new line in c#.
Instead of creating an array explicitly lets just delete the new List<string>() part of the code and make the list in one line of code.

Go back to the Galaxy script and declare a new List of type string called availableStarNames. In the InitializeGalaxy method set this equal to the method we just created in the TextAssetManager script. Don’t forget to pass it starNames.


Now we need to change the CreateStarData method so the star is no longer called Star X (where X is a number). To do this declare a new int in the method called randomIndex. Set this equal to a random number between 0 and availableStarNames.Count – 1.

Where we create starData change the name to availableStarNames[randomIndex]. That will find the name at randomIndex in the list. After we create the planet data remove this name from the list so it can’t be selected again (use the RemoveAt function).

Before hitting play we need to tweak the CreateArms and CreateCentre methods. We need to move the CreateStarData call and starCount++ into the if statement before we call CreateSphereObject. This is because our game was creating more than the required number of stars. Up until now there was no issue with this. However it now throws up a null reference exception error with this new code.

Now hit play and notice all the stars are now named! Also if we enter the solar system view all the planets are correctly named as well :).
That concludes this part. Have a play and try increasing the stars to above 300 (i.e. the number of names we have) it throws up a null reference exception. Like I said before we will fix this in the next part of the tutorial :). We will also look at rotating the star and planet names with the camera.
scripts_for_part_15 (zip file)
