
Hi guys and welcome to part 18. In the last part we created a data structure for our ships and fleets. In this part we will use these structures to create game objects to represent our ships.
In Unity add a new Button as a child to our Canvas object. Name this button Build Ship Button. Move it and anchor it to the top left corner of the screen (click on the square picture under it’s Rect Transform component).


Change the text it displays to “Build Ship” by selecting its child object called Text and finding the text box in the inspector.


Ok so we have a button but it doesn’t do anything yet. Let’s create a new Object in the scene called Player and attach a new script called FleetManager to it. Put FleetManager in the Empires folder (in the Scripts folder).

Open up the new script and add “using System.Collections.Generic” and “using UnityEngine.UI at the top.

Declare a public list called fleetList of type Fleet. Delete the Update method as it won’t be required and in the Start method make fleetList equal to a new List of type Fleet.

Add a new public void method called BuildShip. It doesn’t need to be passed anything for now.

So what is going to happen when we build a ship?
- A new Ship class will be created.
- The Ship is added to a new Fleet class.
- The Fleet class will be added to the fleetList.
- The GameObject will be created.
With this in mind declare a new Ship called ship and a new Fleet called fleet.

Notice how there are red lines under the Ship and Fleet. This is because they are not valid. They both need things passed to them.
What do we do for ship? For now we will just call every ship “Ship X” where X is a number. But how do we get this number? Let’s declare a new int at the top of the class called shipCount. It can remain private for now. Then pass the new Ship “Ship ” + shipCount for its name.
Note: Later on we will use name lists for the ships like we did with the star systems 🙂

All that is left for ship is to add the max hull and max shields. For now I am just going to put 10 for each but feel free to put what ever numbers you’d like.
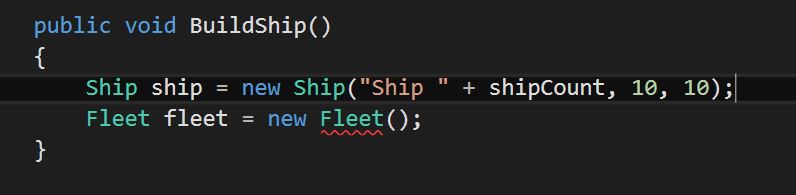
For fleet we should name it “Fleet ” + (fleetList.Count + 1). The plus one is because we haven’t add the fleet to the list yet. Then we also pass it ship.

Then we add fleet to fleetList.

Now all that’s left is to create a GameObject to represent our ship. Let’s be like the Borg and use cubes for our ships (for now). Let’s also position the ships in a random location in the radius of our solar systems (in my game this is 50).
Note: If you have not got the PositionMath script yet you can find it here (paste bin)

In Unity select the Build Ship Button and in the inspector scroll down to the OnClick() section. Click on the + and as the object select Player. As the function select the BuildShip method under the FleetManager selection.

Hit play and press the build ship button. You will see cubes appearing in random locations (it looks better in the solar system view).
I think this will be a good place to stop. In the next part we make it so we cant build ships in the galaxy view and link our ship data with the objects.
On a side note: Sorry there was a long delay in getting this part of the tutorial online, I recently started a new job and things have been a bit crazy. Add this site on twitter (@SP_Coding), I am going to start using this as an update tool to let you guys know what’s going on and when you can expect new posts. All posts are linked to this account as well so if a new one goes up you won’t miss it :).
Scripts_for_part_18 (zip file)
FleetManager (paste bin)
