Hi guys and welcome to part 22. In the last part we set up resources in our game. In this part we will start to look at building specific places ships can be built.
In most 4X games the points at which ships can be built are either planets or star bases. For our game we will be using star bases but the same principles can be applied to the planets if you prefer.
To start with lets make some slight adjustments to our ships. At the moment they are a cube which is one unity unit in size. This is the same size as our planets! We will change there scale to 0.2. We will also change the Y height that they appear slightly above the planets. This will make it easier to distinguish between the ship models and the planet models. To do this we will be using transform.localScale.
Open the FleetManager script and go to the BuildShip method. After we set the ships position set the scale to 0.2.

Next we are going to make some changes to our Planet and Star classes. In our game we want it so we can only build star bases on planets which we own. What we need to do is add a bool to the planets which says weather it is colonised or not. We also need a bool on our Star class to say if it is owned.
Open the Planet script and add a public bool at the top of the class called planetColonised. Set it to False.

Open the Star script and add a public bool at the top of the class called starOwned. Set it to False.

Next we are going to make some temporary materials to show which stars are owned and which planets are colonised. In the assets folder create a new folder called materials and create two new materials (right click in the folder and select create > material). Call them PlanetColonised and StarOwned.

Now we just need to change the colours of the materials. Make them whatever colour you would like but make them two different colours. I have chosen yellow for the stars and blue for the planets.


Open up the Galaxy script and add a new public material called starOwnedMaterial. In the inspector set this to be the new star material.


Do the same in the SolarSystem script but add a second one called planetColonisedMaterial. Dont forget to assign them in the inspector on the Solar System Manager object.


Note: Usually I would not handle the materials like this however we will only be temporarily using them while we set up some other systems so this will do for now.
Now we need to assign a Star this bool and material but which one? For now we will calculate a random number between 0 and the number of stars minus 1 and just assign that star as being owned. For simplicity we will then assign the first planet in that system as being colonised.
Note: Eventually we will assign a home world to each player depending on which race they choose etc. This however requires more systems to be in place first. We will also be able to colonise other planets using colony ships.
In the Galaxy script declare a new private int called StarOwned.

In GalaxyMaths set this new int equal to a random number between 0 and the number of stars – 1.

Make a new void method called SetStarOwned. It does not need to be public but it does need a Star passing to it.

Add an if statement to this new method where if starCount is equal to starOwned, the passed star has its starOwned bool set to true and the first in its planetList is set to colonised.

Where do we call this new method? Well we call it after we increment starCount in both the CreateArms and CreateCentre methods.

Again we need to add a new method. This one is called SetStarMaterial. Make it void and pass it a GameObject and a Star.

Add an if statement, if the star is owned change the material to the starOwnedMaterial. We will need to use GetComponent to find the objects MeshRenderer component.

Now Call this method in both the CreateStarObject method and the ResetGalaxy method.


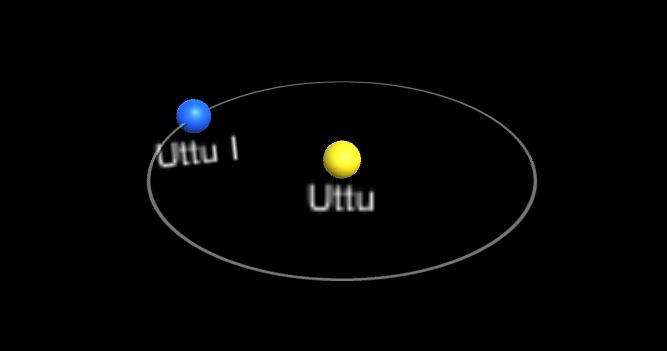
Hit play and look for the star which is now the colour you selected for starOwnedMaterial. In my game (all the default values for the Galaxy and seed 0) Uttu was the star which turned yellow.

Ok so how do we apply the material when we go into the solar system view?
Open up the SolarSystem script. In the CreateSolarSystem method we need to add two if statements. The first should be added just after we create the star object. This is pretty much an exact copy of the if statement we put in our SetStarMaterial method in the Galaxy script. Make sure you have “GameObject starGO” in front of the line where the sphere is created so we have a reference to the object to change the material.

The second goes in our planetList for loop. This one is if planet is colonised set the material to the planetColonisedMaterial. Make sure you add the “GameObject planetGO” before creating the sphere so that we have a reference to the Object to change the material.

Now hit play again and the first planet in the yellow star solar system should be a different colour and so should the star itself.

We can now tell the difference between owned stars and non owned stars :). One last thing we should do before this part ends so that the title of it makes some sense. Create a new script called StarBase in the Empires folder. Make the class a pure class and save it.

And that concludes this part of the tutorial. In the next part we will continue from here and start to setup our star bases.
Scripts_for_part_22 (zip file)
Scripts (Paste Bin)
